Lord of the Rings Debate: How the Battle of Helms Deep Was Won
The forces of Rohan were able to mount a successful defensive operation at the Hornburg through mutually supporting positions, clearly defined fallback criteria, and sound leadership using mission command.
As an engineer officer, I care passionately about just a few things: castles, engineer buttons, and combined arms breaching. And while there were no engineer buttons at Helm’s Deep – a simple oversight, I’m sure – that engagement encompasses a wide swathe of engineer lessons learned.
Yes, this means we’re delving back into the world of J.R.R. Tolkien, to keep him from getting any well-earned rest by pestering him for military insights from his work of fiction, The Two Towers. Specifically, from the engagement between the coalition forces of Rohan and the hybrid threat of Saruman’s army.
And for those of us who care about such things, this is not the actual battle of Helm’s Deep, because that place referred to the ravine behind the fortress. Properly, it is called the Battle of the Hornburg. But since people can’t read maps properly and then some of those people make movies, it has become known as the Battle of Helm’s Deep. And you wonder why historians drink.
This engagement is quite different from that at Minas Tirith which was handled in a previous post. While that was a multi-domain operation with a wide array of forces, this engagement is in essence a light infantry – or even cavalry – defense of key terrain, opposing the most rudimentary of combined arms breaches. That was NTC, this is JRTC. The problem statement becomes, can a light cavalry force fight as heavy infantry inside obstacle belts and still preserve enough combat power to retain the initiative once the enemy attack has culminated?
It all boils down to overmatch and trading space for time, which are two pieces of the modern battlefield that might be very familiar for some readers, especially the ones wearing the obnoxious hats and spurs.
Let’s go ahead and break this down as we always do, looking at it through the lens of our warfighting functions, just like the good staff officers that we are. It’s like a Pavlovian response – say warfighter and all the officers start prattling off.
Now, the situation was thus, if you recall: the nation-state of Rohan had been brought out of neutrality due to the depredations of the upstart region of Isengard, a former protectorate which had now been subverted by Sauron of Mordor. Rohan itself had been infiltrated through a well-placed adviser to King Theoden by the name of Grima Wormtongue, an agent working on behalf of Saruman the White – the ruler in Isengard and a puppet of Sauron. As attacks by Saruman’s insurgent forces began to rise, Grima used his skill in information operations to confuse the situation at Rohan’s court, seed discord among the key leaders, and prevent any serious offensive action against the insurgency.
This was broken by the arrival of Gandalf, who proceeded to undo Grima’s network, restoring functionality to Rohan’s political system. Because the king was not only the civil ruler but also the wartime commander, this also freed up Rohan’s military forces for action. Some small elements of cavalry were already operating against the king’s orders in an effort to disrupt Saruman’s orcs as they attacked civilian targets. Gandalf provided Theoden a full intelligence update, which included the news that a force of about 10,000 orcs and discontented men from Dunland was expected to move in open warfare against Rohan.
Seeing that the insurgency had gotten out of his control and was moving to large scale combat operations, Theoden decided to mass as many of his forces as he could at the Hornburg fortress in order to delay the enemy until further forces could be mustered. This was done under the advisement of Gandalf, who was not only proficient in intelligence but also operations.
Rohan’s force structure consisted of light and medium cavalry formations, specializing in wide area maneuver, reconnaissance, and skirmishing. It contained no air assets, no artillery, and no heavy infantry formations. Troopers could fight on foot as infantry when the case called for it. And because the Riddermark operated on a levy system, they did not have a large standing army once open hostilities began. This is what drove Theoden to a defensive posture, where he would be sacrificing his mobility in favor of survivability.
Theoden’s objective was to survive long enough to seize the initiative from the enemy; failing that, it was to destroy as much of their force as possible, preventing them from mounting another effective offensive operation.
Command and Control
From inside the Hornburg, Theoden and his leadership could count approximately 2,000 troopers who had arrived before the enemy sealed off the main avenue of approach to the fortress. They were facing a force five times their number. Therefore, good mission command would have to be vital for their operation. Unfortunately, Gandalf violated mission command by not providing the most clear instructions that he could have. Leaving his three comrades – Aragorn, Legolas, and Gimli – with Theoden, Gandalf disappeared into the fields on an unnamed mission. His only guidance was to wait for 24 hours, but his GOTWA lacked any other specifics. Leadership in battle would come primarily from Aragorn, whose understanding of ground tactics and his ability to display presence were a major morale boost for Rohan.
While Gandalf was unclear in his intentions, he was just carrying out Theoden’s commander’s intent, however: marshaling all available Riders of Rohan. As the battle began and enemy forces concentrated on the Hornburg, Gandalf rapidly built up combat power from among the scattered riders of Rohan, gaining an additional 1,000 dismounted troopers.
In addition, Gandalf built a coalition with the Ents, ancient guardians of the trees. Saruman had attacked the trees around Orthanc in addition to the people, and so the Ents had grievances with him as well. Utilizing his keen understanding of the situation, Gandalf cemented a relationship between Rohan and the Ents, formulated a two-pronged strategy to destroy the forces of Isengard, and moved quickly to relieve the Hornburg. Due to his swift reading of the situation, Gandalf was able to build combat power through liaison networks and would bring victory out of defeat. He remains the most proficient ideal of the staff officer.
Movement and Maneuver
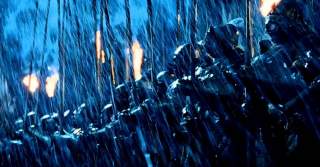
Now, the forces of Rohan specialized in maneuver. Which is ironic, since they could no longer find any way of maneuvering inside their three obstacle belts. For them, they could only see themselves be maneuvered upon by the 10,000 orcs and human irregulars arrayed against them. The enemy force was all light, medium, or heavy infantry, with some light artillery to be employed against the obstacles. The enemy did not maneuver, either, opting for mass over maneuver. In wave assaults, they breached Helm’s Dike – the outer work – first. The first line of defenders conducted an orderly rear passage of lines into the main walls.
From there, the enemy worked to breach the second obstacle, the fortress’s main walls. Working in a storm, they used the rain and cloud cover for obscuration, although it did not prevent small arms fire from the walls of the fortress. Aragorn and Eomer – the key battlefield leader for Rohan – identified where the enemy’s point of breach would be, which was at the gate using a battering ram. They allowed the enemy breaching force to advance past their support by fire until they were isolated in the breach, and then Aragorn and Eomer led a sortie into the breach to destroy the enemy’s engineer assets, which they accomplished. However, the two leaders did not identify the enemy’s redundant breaching asset and assumed that the main threat to the obstacle belt had been destroyed.
Frustrated, the enemy then began to attempt multiple points of breach by scaling the walls with ladders. While this dispersed the defenders and caused some amount of confusion, it was also not the most efficient way of breaching the obstacle. Although there were small breaches, they were quickly sealed, all at massive cost of life to the enemy.
Enemy recon forces finally identified a bypass – a culvert under the main wall. The fixing force rushing through the culvert, enveloping the friendly force from the rear. Aragorn, Legolas – sniper qualified – , and Gimli led the counterattack that sealed this breach. Gimli, a graduate of Engineer Captain’s Career Course, oversaw obstacle reinforcement efforts around the culvert to seal the breach. However, the enemy assault force struck the culvert again, seeing it as the weakest point in the obstacle belt. This time they used an in-stride explosive breach which reduced the obstacle and allowed the exploitation force to follow through the gap and begin outflanking friendly positions.
From here, Aragorn and Eomer led two groups of defenders to their secondary fighting positions: Aragorn into the Burg itself, with Theoden and most of his heavy cavalry, and Eomer into the Glittering Caves with some dismounted troops. Aragorn conducted a leader’s recon at dawn, where he identified that friendly forces had lost all ability to maneuver but that the enemy had grown over-confident in victory and were losing momentum.