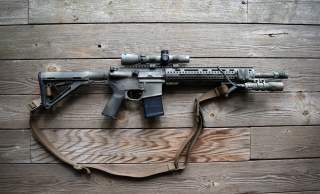
The Real Reason the AR-15 Is So Popular: You Can Build One Yourself
Is it hard to do ?
Key Point: This is how the process works.
As I’ve said before, there are a lot of great AR-15s out there at a variety of price points, but maybe you’re like me and you want to get your hands dirty and try your luck at making one of your own.
Building a fancy, customized precision sniper rifle is something that can be done by hand, but it might take some time and money. For the more frugal beginner who wants to create their first build on a budget, I’ve got you covered.
Today, I’ll show you just how simple it is to build a dependable AR-15 at home for hundreds less than what you would spend on a pre-built model. All you need to do is accumulate everything you need separately, from the upper receiver to the lower receiver to the trigger to the magazines and so on.
Before we jump into it, let’s go over just what you’ll need when planning for your AR-15 build.
THINGS TO CONSIDER WHEN BUILDING A DIY AR-15
-
Cost of Parts
-
Cost of Tools
-
Overall Time
The first thing you should think about is the price of the parts necessary for your build. The various components that comprise the AR-15 are the essential area of consideration as this is what will make your build functional.
Next, you’re gonna want to carefully select the tools that will be required to build your rifle. Tools can get pricey and if you blow your whole wad on them, you likely won’t have enough left over for parts and accessories.
When I built my first AR-15, I made it a point to take inventory beforehand to make sure I had some tools around the house that could work for my build. In this way, I was able to save on cost, ensuring that I would have dollars left over to pick up a good scope and some custom handguards.
On the other hand, if you spend too little on tools, you may find that you are unable to complete your build. For this reason, this is a paramount step in the DIY process.
Finally, you want to consider how much time it’s going to take you from concept to design. This means factoring in the time it will take you to properly research and order parts, tools and accessories; how long it’s going to take to study the how-to process; how long preparation of your work area takes and how much time will be taken up completing the actual build including getting the best scope for the job.
For a budget build, you’ll definitely want to keep an eye on how much you’re spendingsince your end game is to build a model that is significantly cheaper than most preexisting AR-15 models on the market.
My go-to AR rifle kit for a budget build is Palmetto State Armory’s PTAC M4-style carbine kit. It sells for around $400 and it’s got all the mil-spec parts you’ll need to complete your build save for a lower, a mag and a rear sight.
The parts that are absent from the kit can be easily obtained online. Cabela’s offers astripped lower receiver for just under $50.
However, PSA offers a similarly priced lower parts kit that includes a mil-spec trigger that has an 8 lb 9 oz trigger pull, so I think you’ll agree that it’s not too hard to find a reasonably priced lower or lower kit.
That being said, Cabela’s also has you covered in the sight department, selling a pair ofMagpul MBUS sights for as little as $39.99. And speaking of Magpul, they’ve also got asuper-affordable, crush-resistant polymer magazine for just under $13.
If you’re looking for a trigger upgrade, PSA has an EPT upgrade at a sale price of $29.99. You get a government-grade fire control group and a nickel finish, amongst other things. It’s definitely worth the scratch for the smooth trigger experience.
If you’re an avid gun enthusiast, I’m sure you’ll recognize some of the tools that come in standard AR-15 kits. They include a front sight block, a torque wrench, an upper vice block clamp with a gas tube alignment tool, a ring tool, a roll pin installation tool and an adjustable receiver link.
For a budget build, you don’t necessarily need all of these tools (though it doesn’t hurt to have them). A budget build can typically be tackles with a small ball peen hammer, a good multi-tool or a pair of needle nose pliers, a 3” flat head screwdriver, a small drive pin punch and a torque wrench for tightening the castle nut.
When I went with the basic tools for the job, I ended up spending under $200 and completed my build in a small window of time. It is not uncommon for a home build to take eight hours or more, but when you go with the bare essentials, you’ll see quicker results.
By breaking it down to the fundamentals, I was able to create a ready-to-shoot AR-15 in just under 90 minutes. And that was after lubricating everything. By now, I trust you can see just how easy the DIY process can be.
You’ll want to build an AR that’s calibrated to fire a 5.56/.223 round. But keep in mind that you can also customize it to fire 300 blackout rounds or .308 rounds. Alas, that will be pricier if you decide to go that route.
AR-15 ESSENTIALS
There are six key elements to your AR-15 profile—the lower receiver, the upper receiver, the gas system length, the barrel, the BCG (bolt carrier group) and the handguards.
There are four distinct variations on the lower. They are the billet aluminum lower, the cast aluminum lower, the forged aluminum lower and the polymer lower.
While I’ve never owned an AR with a cast aluminum lower, I can tell you from experience that the polymer variant is much lighter than most alternatives. Some people were initially worried that a polymer design would be weak at the front hinge pin, there is no reason to believe that this is the case.
People have claimed that it can break at the buffer tube threading, but I think that’s absolute bosh. I’ve never experienced this myself and don’t ever expect to. What this boils down to is people refusing to accept change.
If you’re concerned that a polymer lower isn’t time-tested, you can do plenty of research online before selecting one. There’s no shortage of testimonials in gun forums and the like.
If you’re on a seriously tight budget, you can always go with a cast aluminum lower. They’re affordable when they’re pre-made and can be made at home for some substantial savings. Cast aluminum lowers are forged from molten aluminum that is poured into a mould.
The uppers are a tad more complex than lowers; there are two distinct systems in an AR—a direct impingement system and a piston system. The standard M4 AR-15 model typically has a direct impingement system.
Direct impingement is a gas-operated system by which high pressure gas from your cartridge being fired is utilized to power a mechanism that excretes your spent casings and chamber a fresh one.
With a piston system, your piston is fixed to the bolt group and circulates through the whole operating cycle.
The direct impingement system is favored by most AR owners due to its lighter weight and potential for pinpoint precision. On the flip side, the piston system also has its advantages; they are generally cooler, cleaner and more adaptable in terms of calibers.
Bear in mind, this is a budget build that we’re attempting so we’ll want to go with the direct impingement system because it’s the more affordable option.
Now, let’s talk about gas system length. Choosing the right gas system is integral to the AR platform because it determines the level of action you’re gonna get out of your firearm. For there to be adequate force to cycle that action, the bullet must still be in the barrel when gas hits the bolt carrier.
Since your bullet is in constant movement, there needs to be an appropriate barrel length remaining so the bullet leaves the muzzle after a sufficient amount of gas has been transferred to the bolt carrier. Without that length, it just won’t work. Plain and simple.
If you have too much barrel, the bolt will end up with too much gas which will inevitably result in leakage. Such leakage can damage the functionality of the entire system. On the other hand, if your barrel is too short, there won’t be enough force to unlock your bolt.
Since the AR-15 barrel has grown shorter over time, we need to place the gas port closer to the muzzle. For a Carbine gas system, you want a 12-16” barrel length. 16” is pretty standard, but that doesn’t mean you can’t go a bit shorter should you so desire.
It’s a good idea to stick to 12-14 inches because the 16 can cause some substantial backpressure if combined with a silencer. This poses a problem if you’re a big game hunter who wants to take down an animal without giving up your position.