The Ultimate Guide To Building an AR-15 (Legally)
You need something called a 'lower'. Read on.
It’s a good idea to stick to 12-14 inches because the 16 can cause some substantial backpressure if combined with a silencer. This poses a problem if you’re a big game hunter who wants to take down an animal without giving up your position.
However, many people prefer the 16” barrel length because it results in less recoil and smoother cycling. Ultimately, it’s entirely up to you. This is your build.
While most barrels are chrome-lined, you can also find stainless steel barrels. With stainless steel, you’ll achieve better accuracy, but the chrome lining has its benefits as well. Fore one, they’re easier to maintain and, furthermore, they tend to be more durable.
The chrome-lined barrel generally offers more longevity than the stainless steel variant, but they both have their advantages. As always, our readers should do their homework before deciding on the one that’s right for them.
Rifle barrels ordinarily have a 1:7 or 1:9 twist rate, but the stainless steel variety often has a 1:8 twist rate. 1:8 is ideal for 55 grain which will save you money since 55 grain ammo is an affordable choice compared to heavier grains.
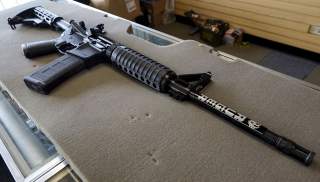
Earlier I mentioned barrel length, but another consideration may be barrel thickness. There are three different barrels you can choose from—standard M4 barrels, lightweight contours or heavy duty barrels.
Obviously, the lightweight one is going to be…well, lighter. And the heavy duty option will be the longest lasting because of its durability, but since we’re talking about a budget build here, I strongly suggest you stick with a standard barrel.
If you’re looking to get the most out of your AR, be sure to budget for your barrel. It’s one of the most important parts of your rifle.
Which brings us to the second most important thing: the BCG (Bolt Carrier Group). As some of you probably already know, once your bullet passes the gas port in your barrel, a portion of the hot gases begin to flow into the gas tube and head for the BCG.
At the bolt carrier group, these gases enter the expansion chamber via the bolt carrier key and begin to exert pressure on the surfaces in the expansion chamber including the piston in the three-ringed bolt tail.
Pushing on the piston, these gases cause the bolt carrier to push back. The bolt carrier’s two drilled holes pass the sealing C rings on the tail of the bolt, causing ventilation of the hot gas. As the bolt carrier moves back, the cam slot at the top exerts pressure on the bolt lug, forcing the bolt to rotate into an unlocked position.
This is an integral piece of the puzzle because it prevents moving parts with a low mass from shaking vigorously, resulting in a smoother shooting experience.
No matter what BCG you use, be sure to stake the gas keys with grade eight fasteners. This will stop the hex bolts on your BCG from coming loose from the pressure of the gas.
Some people erroneously believe that any old BCG will do, suggesting that a dirt cheap BCG works the same as a more expensive one. Again, this is not an area in which you want to skimp. The BCG is the heart and soul of your AR and it’s imperative that it works properly.
The reality is, all BCGs are reasonably priced. The highest quality BCG can usually be found for between $70 and $100. Personally, I would recommend Anderson Manufacturing .223/5.56 BCG. It’s just $119.99 and it’s got everything that more expensive models have. It’s chrome-lined and a steel bolt that’s coated with corrosion-resistant phosphate.
Finally, you want to get your hands on some good handguards. While most uppers already come with handguards, some may not. In that case, a solid option is the Magpul MOE handguard. Even though standard handguards are generally cheaper, you’ll find that rail guards and the like are more accessory-friendly.
No matter which one you settle on, you’ll still be saving what you would have spent buying a pre-built AR-15 from an online retailer or gun shop.
SAFETY FIRST
Before you get started, you want to take all proper precautions. You should be sure to wear safety glasses to protect yourself against flying pins or springs. The little buggers can easily spring up (no pun intended) and injure you or someone else.
Building a gun can be a dirty job what with lube and oil, so it’s a good idea to wear an apron. If you don’t have one, you can always wear some ratty old sweatshirt.
Since you’re dealing with small parts that will invariably end up falling on the floor, it’s important to keep a clean work area. Personally, I like to lay out a white sheet or drop cloth so that I can easily collect any rogue springs or pins after they’ve gone astray.
GETTING STARTED
Once you’ve procured everything you need for your AR build, you’ll want to arrange all your tools and parts on your work surface. Make one or two rows for your tools and one or two rows for your parts so they don’t get mixed up.
Group your parts together in order of assembly.
The first thing you want to do is assemble your forward assist on your upper. This will consist of your forward assist, your forward assist spring and your roll pin.
You want to turn your upper upside down so your Picatinny rail is flush with your work surface. Then you want to slide your spring in either direction and get your forward assist pin in the bottom of your upper so it’ll stand. Using a starter punch, drive a series of punches into the side.
Insert your forward assist assembly so that the pawl is flush with the middle of your upper.
Slide the assembly into the upper and compress the assembly. As you’re doing this, you want to simultaneously drive the pin into the assembly until it is flush with your upper.
Once this feels firm, you should be able to let go of the forward assist. At this point, you can drive a large brash punch into the pin.
Now you should be able to test out your forward assist to see if it moves with ease. If free mobility has been achieved, you’re all set with your upper.
EJECTION PORT COVER INSTALLATION
The next step is to install your ejection port cover. For this, you should have your ejection port cover as well as a cover pin, a cover pin snap ring and a cover spring.
You want to hammer your snap ring all the way on to your cover pin. Take care to make a precise, downward strike on the ring.
Place your upper on its side and so your port is facing upwards and begin the ejection cover pin. Start with the end that doesn’t have the snap ring.
Put the ejection port cover on your upper so that it’s open and align your cover’s holes with those of your upper.
Slide your cover pin through the hole closest to your upper’s barrel threads.
Now, hold your cover spring firmly in your left hand and take hold of the longer part of the spring that’s sticking out. You want to wind the spring a half a revolution away from yourself so that the spring faces you.
Holding the spring under tension, you want to put the long end on the right side of your port cover then slide the cover pin all the way through so that your snap ring stops you.
At this point, you should be able to shut your ejection port cover. You’ll know if you were successful if it snaps closed.
To test ‘er out, just push the ejection port cover to see if it snaps open. If it does then you’re ready for the next step.
BOLT CARRIER GROUP ASSEMBLY
BCG assembly should be a breeze if you’ve gotten this far. For this step, you should have a bolt, bolt carrier, bolt cam pin, firing pin and retaining pin. Again, most of these are available in kits.
First, you want to press the bolt into the end of your bolt carrier. Then you want to insert the cam pin into the hole in your bolt carrier. This is located right beneath your bolt carrier key.
When your cam pin is in place, you should rotate it a quarter of a turn so the holes in it are aligned with the front and back of your carrier.